
Deploy Your Machine Learning Models for Free
Go beyond Notebooks without breaking your bank.

Introduction
You developed your fancy Machine Learning Model. And now? How can other people interact with it? Leaving it in your Jupyter Notebook isn’t the best solution.
But, how can you do it? There are many ways. AWS, Google Cloud, MS Azure - you name it. I know - you probably don’t want to spend money on your hobby project. So, where can you deploy it for free?
Good news - Render, a PaaS, offers a generous free tier for your hobby projects. When I searched for an alternative to Heroku, I found Render. It has established itself as the best one for hobby projects without spending any money.
In this article, I will show you how easy it is to set up and deploy your models on Render. We will use FastAPI and a serialized model from scikit-learn.
The source code can be found on GitHub. And I am not affiliated with Render.
Setting up our ML API
For our use case, I already trained a basic LinearRegression model with scikit-learn on the California Housing Dataset. I only used the feature total_rooms to predict median_house_value. Our goal is not to optimize our model but to deploy it. You can find the serialized model in my repository.
First, create a public GitHub repository and clone it. I named mine render-test-app.
Then, install the required packages below. It’s essential to use the exact versions since Render runs on Python 3.7.10:
#requirements.txt
fastapi==0.103.1
scikit-learn==1.0.2
uvicorn==0.22.0
We will need uvicorn as a web server for FastAPI.
Create a file named main.py and define the following endpoints:
#main.py
import numpy as np
from fastapi import FastAPI
from joblib import load

app = FastAPI()

@app.get("/")
async def root():
 return {"greeting": "Hello World!"}

@app.get("/predict")
async def predict(total_rooms: int):
    model = load("model.joblib")
    prediction = model.predict(np.array(total_rooms).reshape(1,-1))[0]
    return {"prediction": prediction}
We define our /predict endpoint where we load our model and make the prediction. Since scikit-learn expects a 2D-Array, we put the input from total_rooms into a numpy array and reshape it. Since we only need the prediction from the array, we take the first element.
Now, export your dependencies into a requirements.txt file:
$ pip freeze > requirements.txtAnd commit and push everything:
$ git add .

$ git commit -m "Create basic API for prediction"

$ git push
Let’s see how we can get this API deployed with Render.
Deploying on Render Account
You may ask, what is Render?
Render is a unified cloud to build and run all your apps and websites with free TLS certificates, a global CDN, DDoS protection, private networks, and auto deploys from Git.
Their interesting point is their free tier with 500 build minutes per month and auto deploys from Git.
First, create an account on Render and verify your account.
Then, go to your dashboard and create a new web service (see below).

Now, scroll down to Public Git Repositories and paste your repository link here. Render makes it easy to deploy from here.
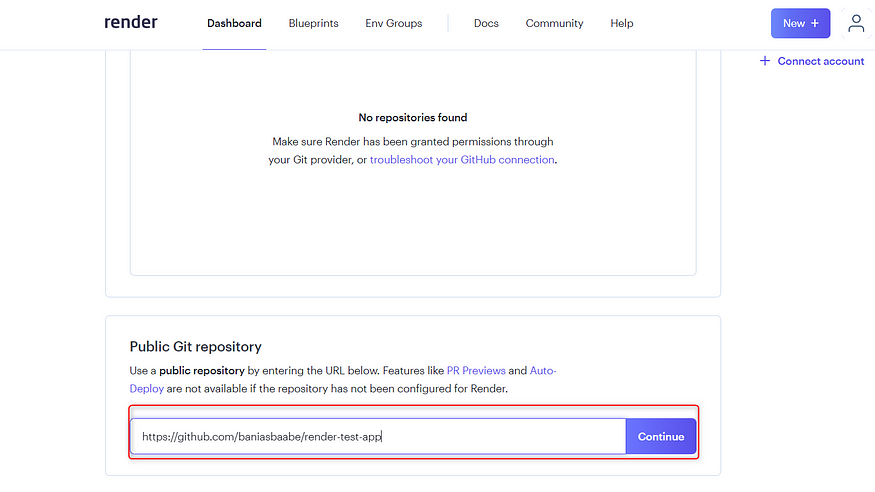
Click on Continue. In the next steps, provide the necessary steps to build the app. Fortunately, it’s straightforward.
Your configuration should look something like this:

When everything is done right, you will be redirected to the created web service. You have to wait a few minutes for the build and deploy step.
After seeing a success message, go to the provided link and see if it works. It should look like below.

🚀 It works! Now let’s call the /predict endpoint with total_rooms=4.

🤗 Nice!
Now, what if we want to make changes?
Let’s change the greetings from “Hello World” to “Hello Substack Reader!”:
@app.get("/")
async def root():
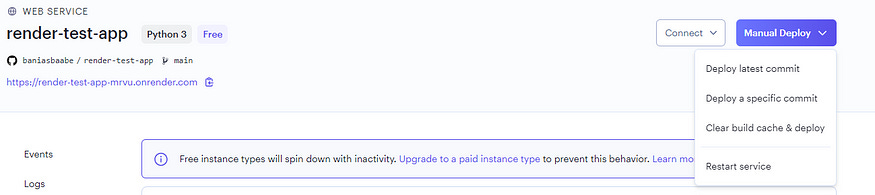
return {"greeting":"Hello Substack reader!"}Commit and push everything, and go to the overview of the web service in Render. Click on Manual Deploy and choose Deploy latest commit.
Now, wait again until the deployment is finished.
Conclusion
You learned, how easy it is to set up to deploy a ML model with FastAPI and Render. There is much more to explore with Render, like using environment variables or a different dependency manager like Poetry instead of pip.
You may guess it - the free tier is limited. When the API/App is inactive, you will deal with cold starts. Furthermore, you have only 512 MB and 0.15 CPU per App, which isn’t optimal for heavy ML models. Still, it’s a good option for your next hobby project or prototypes.